Best Practices for Security
General security best practices
The following list gives you some general best practices for securely administering a web application like SquaredUp DS Standalone. The list gives you recommendations only and is not comprehensive.
- Authentication
The best way to ensure secure authentication is to choose multifactor authentication. Requirements:- You need to enable Windows (SSO) authentication.
You need to set up multifactor authentication for your Active Directory. Learn more about the different ways to do that in this external article: https://www.microsoft.com/en-gb/security/business/identity-access-management/mfa-multi-factor-authentication
- Check your Active Directory security policies.
In addition to your existing Active Directory Password Policy, you should define an Account Lockout Policy. While your Password Policy ensures that your passwords are safe, an Account Lockout Policy defines what happens when the password is incorrectly entered. It secures accounts against brute force attacks by locking an account after a defined number of false login attempts.You can find a detailed description about Active Directory Password Policy Settings in this external article: https://activedirectorypro.com/how-to-configure-a-domain-password-policy
Password Policy SettingRecommended SettingEnforce Password History24Maximum password agenot setMinimum password agenot setMinimum password length14Password must meet complexityEnabledStore passwords using reversible encryptionDisabled- Open the Group Policy Management Console.
- Go to Domains > [Your domain] > Group Policy Objects.
- Right click the domain policy you want to edit.
- In the domain, go to Computer Configuration\Policies\Windows Settings\Security Settings\Account Policies\Account Lockout Policy.

- Enter the following settings: SettingDescriptionRecommended ValueAccount lockout durationThis is how long the account will remain locked for – the higher this value, the longer it is between attempts60 minutesAccount lockout thresholdThis is the number of attempts before the account will lock3 invalid logon attemptsReset account lockout counter afterDefines when the failed attempt counter will reset (meaning that x incorrect attempts within this period will cause the lockout)30 minutes
The Account Lockout Policy is now set.
- Use HTTPS instead of HTTP.
See How to configure TLS/SSL (HTTPS)
After you configured HTTPS, you have two options:
a) The less secure option is to keep using HTTP alongside with HTTPS. In that case, you should redirect HTTP requests to HTTPS.b) The more secure option is to only allow HTTPS by enabling HSTS. This option "disables" HTTP, meaning it is not possible to use HTTP anymore.To redirect all HTTP requests to HTTPS use the following steps:
- Open IIS Manager and click on the website that hosts the SquaredUp DS instance (this is normally Default Web Site).
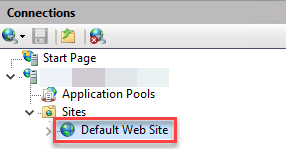
- In the main panel, double-click on URL Rewrite.

- Click Add Rule(s)... on the right-hand menu.

- With Blank rule selected click OK.
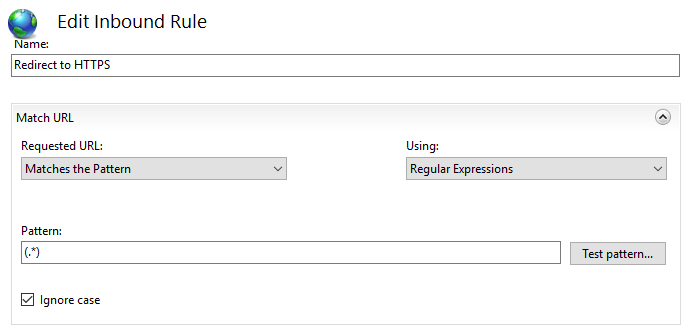
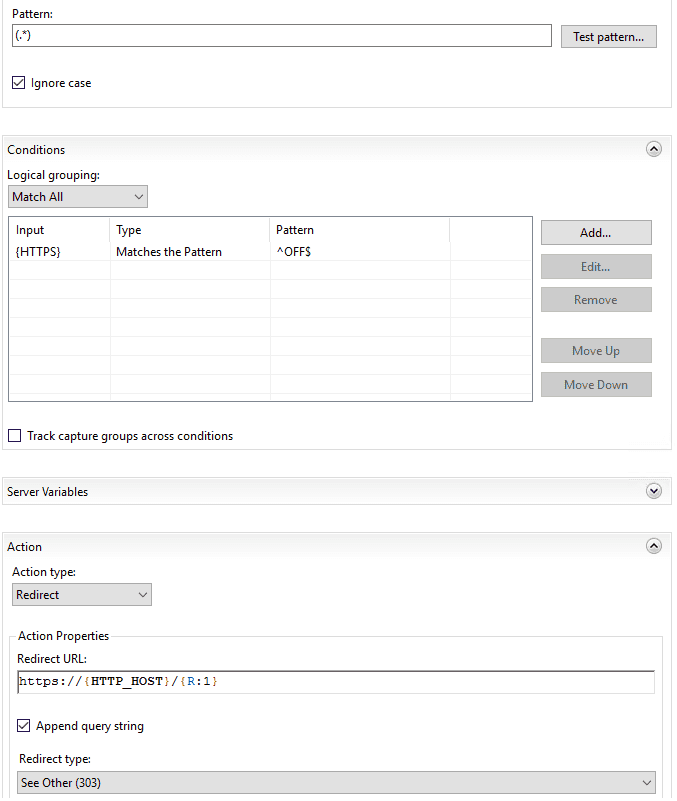
- Give the rule a name, such as 'Redirect to HTTPS'.
- Copy the following and paste into the Pattern box in the Match URL section:
(.*)
- Click to expand the Conditions section.
- Click Add… to add a new condition to the configuration.
- Copy the following and paste into the Condition input box :
{HTTPS} - Copy the following and paste into the the Pattern box:
^OFF$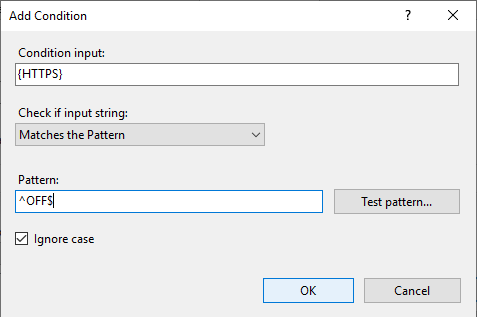
- Click OK.
- Scroll down and in the Action section
- In the Action section change the Action type from Rewrite to Redirect.
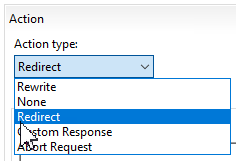
- Copy the following and paste into the Redirect URL box:
https://{HTTP_HOST}/{R:1} - Change the Redirect type from Permanent (301) to See Other (303).
- Click Apply on the right-hand menu under Actions.

- Click Back to Rules.
- If you have other redirects configured you should ensure that you move your Redirect to HTTPS redirect to be listed first as shown in the image below. You can do this using the Move Up and Move Down options on the right.
HTTP Strict Transport Security (HSTS) is a policy mechanism that allows a web server to enforce the use of TLS in a web browser. HSTS allows for a more effective implementation of TLS by ensuring all communication takes place over a secure transport layer on the client side.
- Run the following PowerShell script on the server SquaredUp DS is installed on to enable HSTS:
# TEST SECURITY OF WEBSERVER - https://www.ssllabs.com/ssltest/index.html

cls

$MaxAge = 63072000 # Enables policy for 2 Years
#$MaxAge = 600 # Enables policy for 10 minutes (for testing purposes)
#$MaxAge = 60 # Enables policy for 1 minutes (for testing purposes)
#$MaxAge


$WebSite = "Default Web Site"


Import-Module IISAdministration

Reset-IISServerManager -Confirm:$false

Start-IISCommitDelay

$webConfig = Get-IISConfigSection -SectionPath "appSettings" -CommitPath "Default Web Site"

$collection = Get-IISConfigCollection -ConfigElement $webConfig

#New-IISConfigCollectionElement -ConfigCollection $collection -ConfigAttribute @{key='test';value='test2'}


# get site collection
$sitesCollection = Get-IISConfigSection -SectionPath "system.applicationHost/sites" | Get-IISConfigCollection

# get web site you'd like to set HSTS
# specify the name of site for "name"="***"
$siteElement = Get-IISConfigCollectionElement -ConfigCollection $sitesCollection -ConfigAttribute @{"name"="$WebSite"}

# get setting of HSTS for target site
$hstsElement = Get-IISConfigElement -ConfigElement $siteElement -ChildElementName "hsts"

# enable HSTS for target site
Set-IISConfigAttributeValue -ConfigElement $hstsElement -AttributeName "enabled" -AttributeValue $true

# set [max-age] of HSTS as 31536000 sec (365 days)
# for [max-age], refer to https://hstspreload.org/
Set-IISConfigAttributeValue -ConfigElement $hstsElement -AttributeName "max-age" -AttributeValue $MaxAge

# set [includeSubDomains] of HSTS as enabled
# this option applys to all subdomains
Set-IISConfigAttributeValue -ConfigElement $hstsElement -AttributeName "includeSubDomains" -AttributeValue $true

# set [redirectHttpToHttps] of HSTS as enabled
Set-IISConfigAttributeValue -ConfigElement $hstsElement -AttributeName "redirectHttpToHttps" -AttributeValue $true

Stop-IISCommitDelay

Remove-Module IISAdministration
- Open IIS Manager and click on the website that hosts the SquaredUp DS instance (this is normally Default Web Site).
- Disable outdated TLS and SSL
SquaredUp DS uses TLS 1.2, but offers connections with TLS 1.0 and TLS 1.1, which are deprecated. Outdated TLS and SSL can pose a security risk and can be disabled to make using SquaredUp DS more secure.
Note: Disabling TLS 1.0 and TLS 1.1 can cause compatibility issues which might restrict older devices from being able to connect to the server.
You can change the settings manually via script or via the IIS Crypto tool.Recommended settings:
- Disable TLS 1.0
- Disable TLS 1.1
- Disable SSL 2.0
- Disable SSL 3.0
- Enable TLS 1.2
- Run the following PowerShell script on the server SquaredUp DS is installed on to disable TLS 1.0:
#DISABLE TLS 1.0 $RegPath = "HKLM:\SYSTEM\CurrentControlSet\Control\SecurityProviders\SCHANNEL\Protocols" Set-Location HKLM: if (Test-Path "$RegPath\TLS 1.0") { "TLS 1.0 YEP" if (Test-Path "$RegPath\TLS 1.0\Client") { "CLIENT YEP" Remove-Item -Path "$RegPath\TLS 1.0" -Recurse } } New-Item -Path "$RegPath" -Name "TLS 1.0" –Force New-Item -Path "$RegPath\TLS 1.0" -Name "Client" –Force New-ItemProperty -Path "$RegPath\TLS 1.0\Client" -Name DisabledByDefault -Value 1 -Type DWORD -Force | Out-Null New-ItemProperty -Path "$RegPath\TLS 1.0\Client" -Name Enabled -Value 0 -Type DWORD -Force | Out-Null New-Item -Path "$RegPath\TLS 1.0" -Name "Server" –Force New-ItemProperty -Path "$RegPath\TLS 1.0\Server" -Name DisabledByDefault -Value 1 -Type DWORD -Force | Out-Null New-ItemProperty -Path "$RegPath\TLS 1.0\Server" -Name Enabled -Value 0 -Type DWORD -Force | Out-Null Restart-Computer -Confirm - Run the following PowerShell script on the server SquaredUp DS is installed on to disable TLS 1.1:
#DISABLE TLS 1.1 $RegPath = "HKLM:\SYSTEM\CurrentControlSet\Control\SecurityProviders\SCHANNEL\Protocols" Set-Location HKLM: if (Test-Path "$RegPath\TLS 1.1") { "TLS 1.1 YEP" if (Test-Path "$RegPath\TLS 1.1\Client") { "CLIENT YEP" Remove-Item -Path "$RegPath\TLS 1.1" -Recurse } } New-Item -Path "$RegPath" -Name "TLS 1.1" –Force New-Item -Path "$RegPath\TLS 1.1" -Name "Client" –Force New-ItemProperty -Path "$RegPath\TLS 1.1\Client" -Name DisabledByDefault -Value 1 -Type DWORD -Force | Out-Null New-ItemProperty -Path "$RegPath\TLS 1.1\Client" -Name Enabled -Value 0 -Type DWORD -Force | Out-Null New-Item -Path "$RegPath\TLS 1.1" -Name "Server" –Force New-ItemProperty -Path "$RegPath\TLS 1.1\Server" -Name DisabledByDefault -Value 1 -Type DWORD -Force | Out-Null New-ItemProperty -Path "$RegPath\TLS 1.1\Server" -Name Enabled -Value 0 -Type DWORD -Force | Out-Null Restart-Computer -Confirm - Run the following PowerShell script on the server SquaredUp DS is installed on to disable SSL 2.0:
#DISABLE SSL v2.0 $RegPath = "HKLM:\SYSTEM\CurrentControlSet\Control\SecurityProviders\SCHANNEL\Protocols" Set-Location HKLM: if (Test-Path "$RegPath\SSL 2.0") { "SSL 2.0 YEP" if (Test-Path "$RegPath\SSL 2.0\Client") { "CLIENT YEP" Remove-Item -Path "$RegPath\SSL 2.0" -Recurse } } New-Item -Path "$RegPath" -Name "SSL 2.0" –Force New-Item -Path "$RegPath\SSL 2.0" -Name "Client" –Force New-ItemProperty -Path "$RegPath\SSL 2.0\Client" -Name DisabledByDefault -Value 1 -Type DWORD -Force | Out-Null New-ItemProperty -Path "$RegPath\SSL 2.0\Client" -Name Enabled -Value 0 -Type DWORD -Force | Out-Null New-Item -Path "$RegPath\SSL 2.0" -Name "Server" –Force New-ItemProperty -Path "$RegPath\SSL 2.0\Server" -Name DisabledByDefault -Value 1 -Type DWORD -Force | Out-Null New-ItemProperty -Path "$RegPath\SSL 2.0\Server" -Name Enabled -Value 0 -Type DWORD -Force | Out-Null Restart-Computer -Confirm - Run the following PowerShell script on the server SquaredUp DS is installed on to disable SSL 3.0:
#DISABLE SSL v3.0 $RegPath = "HKLM:\SYSTEM\CurrentControlSet\Control\SecurityProviders\SCHANNEL\Protocols" Set-Location HKLM: if (Test-Path "$RegPath\SSL 3.0") { "SSL 3.0 YEP" if (Test-Path "$RegPath\SSL 3.0\Client") { "CLIENT YEP" Remove-Item -Path "$RegPath\SSL 3.0" -Recurse } } New-Item -Path "$RegPath" -Name "SSL 3.0" –Force New-Item -Path "$RegPath\SSL 3.0" -Name "Client" –Force New-ItemProperty -Path "$RegPath\SSL 3.0\Client" -Name DisabledByDefault -Value 1 -Type DWORD -Force | Out-Null New-ItemProperty -Path "$RegPath\SSL 3.0\Client" -Name Enabled -Value 0 -Type DWORD -Force | Out-Null New-Item -Path "$RegPath\SSL 3.0" -Name "Server" –Force New-ItemProperty -Path "$RegPath\SSL 3.0\Server" -Name DisabledByDefault -Value 1 -Type DWORD -Force | Out-Null New-ItemProperty -Path "$RegPath\SSL 3.0\Server" -Name Enabled -Value 0 -Type DWORD -Force | Out-Null Restart-Computer -Confirm - Run the following PowerShell script on the server SquaredUp DS is installed on to enable TLS 1.2:
#Enable TLS 1.2 $RegPath = "HKLM:\SYSTEM\CurrentControlSet\Control\SecurityProviders\SCHANNEL\Protocols" Set-Location HKLM: if (Test-Path "$RegPath\TLS 1.2") { "TLS 1.2 YEP" if (Test-Path "$RegPath\TLS 1.2\Client") { "CLIENT YEP" Remove-Item -Path "$RegPath\TLS 1.2" -Recurse } } New-Item -Path "$RegPath" -Name "TLS 1.2" –Force New-Item -Path "$RegPath\TLS 1.2" -Name "Client" –Force New-ItemProperty -Path "$RegPath\TLS 1.2\Client" -Name DisabledByDefault -Value 0 -Type DWORD -Force | Out-Null New-ItemProperty -Path "$RegPath\TLS 1.2\Client" -Name Enabled -Value 1 -Type DWORD -Force | Out-Null New-Item -Path "$RegPath\TLS 1.2" -Name "Server" –Force New-ItemProperty -Path "$RegPath\TLS 1.2\Server" -Name DisabledByDefault -Value 0 -Type DWORD -Force | Out-Null New-ItemProperty -Path "$RegPath\TLS 1.2\Server" -Name Enabled -Value 1 -Type DWORD -Force | Out-Null Restart-Computer -Confirm - Run the following script in case you need to undo all changes you made to TLS and SSL:
#Revert Changes

Remove-Item 'HKLM:\SYSTEM\CurrentControlSet\Control\SecurityProviders\SCHANNEL\Protocols\SSL 3.0\' -Recurse
Remove-Item 'HKLM:\SYSTEM\CurrentControlSet\Control\SecurityProviders\SCHANNEL\Protocols\TLS 1.0\' -Recurse
Remove-Item 'HKLM:\SYSTEM\CurrentControlSet\Control\SecurityProviders\SCHANNEL\Protocols\TLS 1.1\' -Recurse

Restart-Computer -Confirm
- Download IIS Crypto from Nartac Software.
https://www.nartac.com/Products/IISCrypto/Download - Open IIS Crypto and go to the Templates tab.
- Choose the PCI 3.2 option from the drop-down.
The PCI 3.2 option provides PCI (Payment Card Industry) compliance.
This setting will block the following client and server protocols:
TLS 1.2 will still be enabled.
The following ciphers will be disabled:- Multi-Protocol Unified Hello
- PCT 1.0
- SSL 2.0
- SSL 3.0
- TLS 1.0
- TLS 1.1
- NULL
- DES 56/56
- RC2 40/128, 56/128, 128/128
- RC4 40/128, 56/128, 64/128, 128/128
- Check the settings in the Schannel and Cipher Suites tabs to make sure you're happy with all settings.
- Check the Reboot box at the bottom of the tool and click Apply.
- Remove unwanted HTTP response headers.
There are 3 response headers you should remove for security reasons:
- Server - Specifies web server version
- X-Powered-By - Indicates that the website is "powered by ASP.NET."
- X-AspNet-Version - Specifies the version of ASP.NET used
Note: This method does not remove the header itself, but removes the value of it.
You can find other methods of removing the headers and more details about this security issue in this external article: https://techcommunity.microsoft.com/t5/iis-support-blog/remove-unwanted-http-response-headers/ba-p/369710
- Open IIS Manager and click on your SquaredUp DS instance.
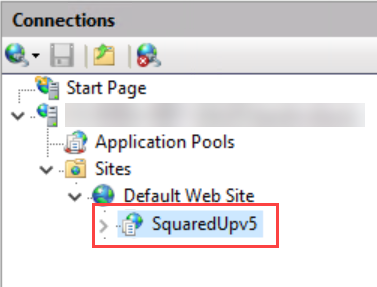
- In the main panel, double-click on URL Rewrite.

- Click on View Server Variables in the Actions panel on the right hand side.
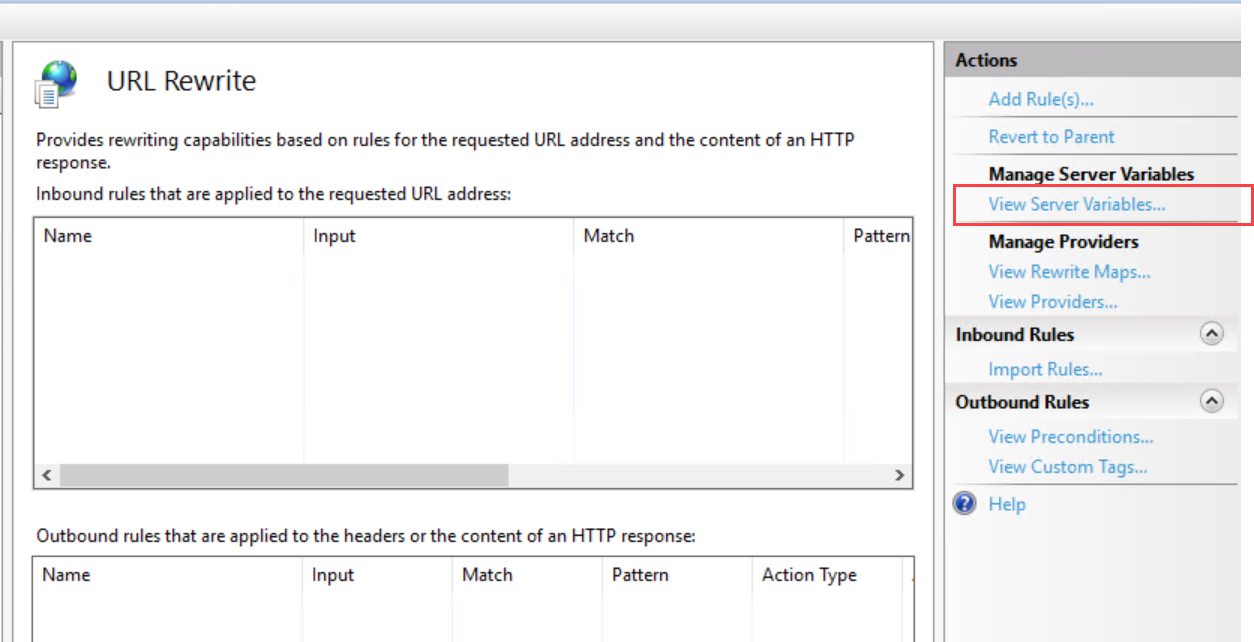
- Click the Add button in the Actions panel.
- Add 3 new variables, one for each header you want to remove:
RESPONSE_SERVER for removing the Server header
RESPONSE_X-POWERED-BY for removing the X-Powered-By header
RESPONSE_X-ASPNET-VERSION for removing the X-AspNet-Version header
You can see the newly created server variables in the list of allowed variables.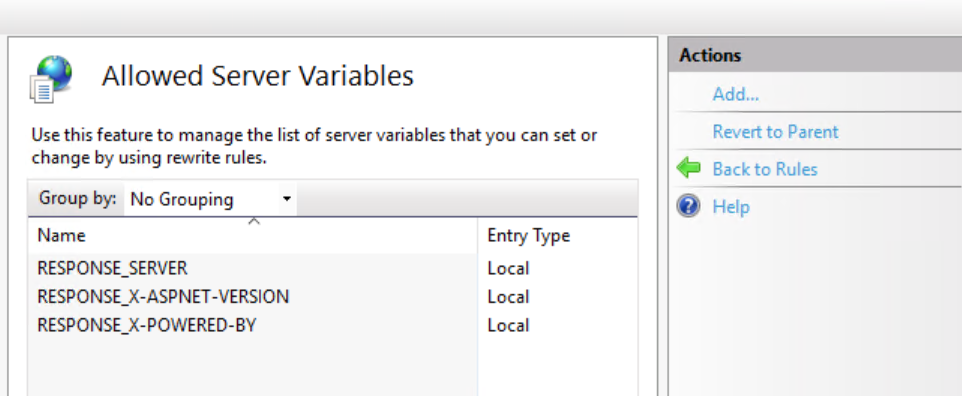
- Click the Back to rules button in the Actions panel.
- Click the Add rule(s) button in the Actions panel.
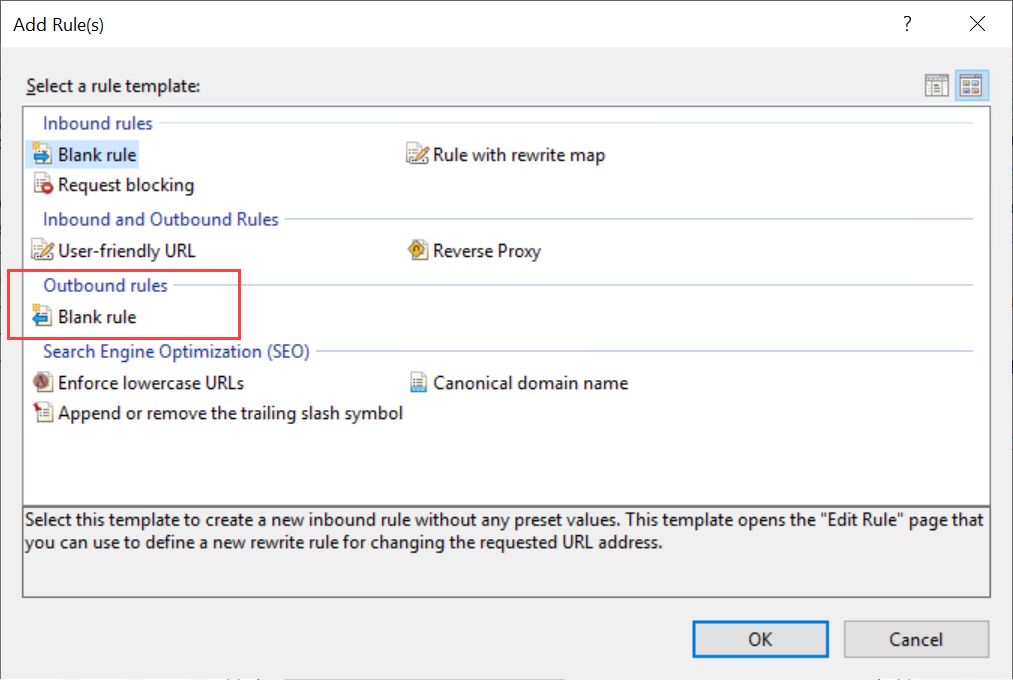
- Create 3 new rules, one for each header you want to remove. Choose Outbound rules > Blank rule for each rule.
- Enter the following settings for each rule:
Name: Give the rule a name, for example "Remove Server Header"
Precondition: None
Matching scope: Server Variable
Variable name: RESPONSE_SERVER
(use RESPONSE_X-POWERED-BY and RESPONSE_X-ASPNET-VERSION for your other two rules)
Variable value: Matches the pattern
Using: Regular Expressions
Pattern: .*
(read "dot asterisk", meaning "match any content")
Action type: Rewrite
Leave the other settings to default. - Click the Apply button in the Actions panel.
- Block requests without a Host header.
HTTP version 1.0 request to the server (for any URI) without the Host header set will cause the server to reveal its internal IP address.
This vulnerability is known as Client Access Server Information Disclosure. The issue applies to IIS after 6.0 and before 10.0. You can find more information in this external article: https://www.cyberis.co.uk/blog/cas_info_disclosure.html
- Open IIS Manager and click on your SquaredUp DSinstance.

- In the main panel, double-click on URL Rewrite.

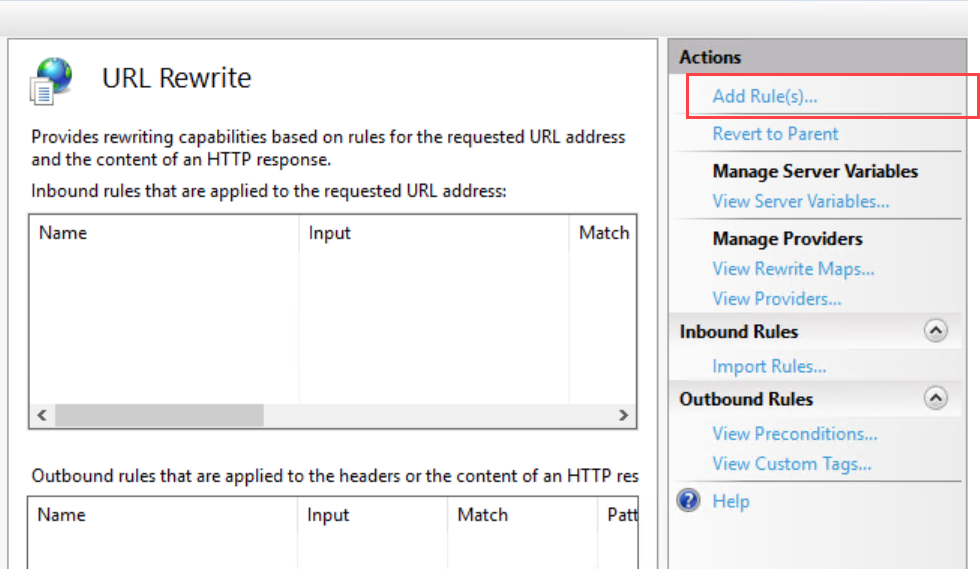
- Click on Add rule(s) in the Actions panel on the right hand side.
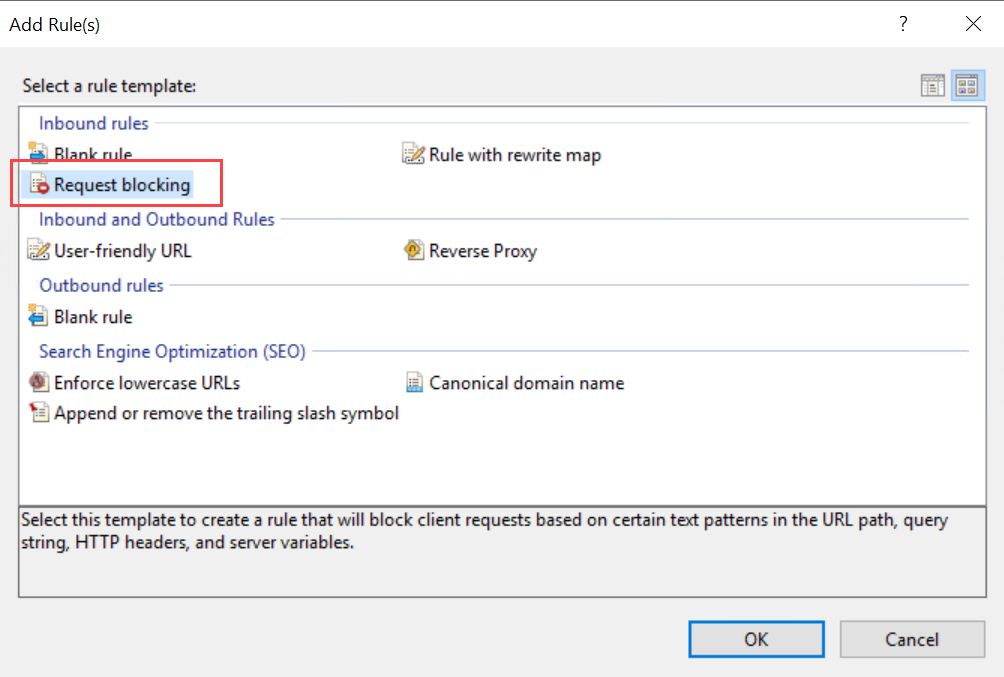
- Choose Inbound rules > Request blocking.
- Enter the following settings for the rule:
Block access based on: Host Header
Block request that: Does not match the pattern
Pattern (Host Header): .+
(read: "dot plus", meaning "match one or more of any characters")
Using: Regular Expressions
How to block: Abort request - Click OK to save the rule.
You can now see the rule in the URL rewrite module. Connections made via HTTP 1.0 without a Host header will now be rejected by the server.
- Open IIS Manager and click on your SquaredUp DSinstance.
- Use secure cookies.
By default, SquaredUp DS works over HTTP and requires a manual setup to enable HTTPS. If you use secure cookies, they will be sent to the browser with the
secureflag, which means the browser will never send the cookies over HTTP.Since cookies won't be send over HTTP when the cookie setting is set to
requireSSL="true", SquaredUp DS will not function over HTTP with this setting. Your SquaredUp DS instance needs to be setup with HTTPS.Find the
web.configfile located in the SquaredUp DS folder.Create a backup of theName of the SquaredUp folder
The default name of the SquaredUp folder is
SquaredUpfor v6 and above.For v5 it is
SquaredUpv5.Location of the SquaredUp folder
If you deployed SquaredUp DS via the Azure or AWS Marketplace:
The default location for the SquaredUp folder is
F:\.SquaredUpv[Version Number]
For v5 it isF:\SquaredUpv5.If you installed SquaredUp DS using the installer:
A custom location may have been chosen during the installation.
The default location for the SquaredUp folder is
C:\inetpub\wwwroot\SquaredUpFor v5 it is
C:\inetpub\wwwroot\SquaredUpv5.web.configfile by copy and pasting the file to a different location.Open the originalweb.configfile with Notepad.- Find the following line:
and extend it to:
<httpCookies httpOnlyCookies="true" />
<httpCookies httpOnlyCookies="true" requireSSL="true" />
- Save the
web.configfile.Since cookies won't be send over HTTP when the cookie setting is set to
requireSSL="true", SquaredUp DS will not function over HTTP with this setting. Your SquaredUp DS instance needs to be setup with HTTPS.
- Find the following line:
- Prevent embedding via iframe.
By default, SquaredUp DS can be embedded in other pages via iframe. This applies to authenticated SquaredUp DS links (a dashboard that needs signing it to be viewed) as well as unauthenticated links (Open Access dashboards). To prevent clickjacking, you can restrict embedding.You have two options to restrict embedding:
- prevent all embedding for authenticated and unauthenticated links (DENY option)
- restrict embedding so that SquaredUp DS content can only be embedded within SquaredUp DS (SAMEORIGIN option)
- Open IIS Manager and click on your SquaredUp DS instance.

- In the main panel, double-click on HTTP response headers.
- Check the list of headers for a header named X-Frame-Options. If the header is not in the list, add a new header named X-Frame-Options.
You have two options to restrict embedding:
- prevent all embedding for authenticated and unauthenticated links (DENY option)
- restrict embedding so that SquaredUp DS content can only be embedded within SquaredUp DS (SAMEORIGIN option)
DENYorSAMEORIGIN.
Embedding is now restricted according to the option you chose.
Security best practices for administering SquaredUp DS Standalone
The following list gives you best practices for securely administering SquaredUp DS Standalone.
- PowerShell tiles:
- PowerShell Run As accounts
PowerShell scripts are very powerful and can cause damage when not properly configured. Your Run As accounts contain the credentials a script uses to run as, which means the Run As determines the permissions a PowerShell script has when it is executed. When you are creating Run As accounts, you want to give your PowerShell scripts the minimum permissions needed so that they can do what you intended for them to do without giving them permissions that can be exploited and could lead to security risks.
1) For all Run As accounts: Use a service account, not a user account for Run As accounts.
Do not use your own or anyone's personal user account for Run As accounts. Instead, create a new account that is not used by a specific person (a "service account"), but only used for running PowerShell scripts. Consider the permissions of this service account carefully.
Required permissions for service accounts:
The service account you use for Run As must have at least the following permission:
- Allow log on locally
If you don't use the default NetworkService as your application pool identity, you might see the following error message when using Run As accounts: A required privilege is not held by the client.
In this case you need to add the application pool identity to the following policies:
- Adjust memory quotas for a process
- Replace a process-level token (you need to reboot the server for this policy to take effect)
The user credentials you enter for the Run As account are used to run all PowerShell scripts in tiles that use the Run As account. Once created, your Run As account can be used by other SquaredUp DS administrators to run their scripts. By using your or any user's credentials, you lose control over which scripts are executed in the name of this user which can cause privacy issues. In addition to that, users often have more rights than a script would need. By using a user account with extensive permissions, scripts that use the Run As can exploit those permissions.
- From the top right hand menu ☰ click system.
- Go to the PowerShell tab.
- In the Run As section, click on the + button to add a new Run As.
- Enter a name and a description for your new Run As.
Note: Once you have saved the Run As account, you can't change its name anymore. You can always change the description. - Enter the user credentials you want to use for this Run As account.
Do not use your own or anyone's personal user account for Run As accounts. Instead, create a new account that is not used by a specific person (a "service account"), but only used for running PowerShell scripts. Consider the permissions of this service account carefully.
Required permissions for service accounts:
The service account you use for Run As must have at least the following permission:
- Allow log on locally
If you don't use the default NetworkService as your application pool identity, you might see the following error message when using Run As accounts: A required privilege is not held by the client.
In this case you need to add the application pool identity to the following policies:
- Adjust memory quotas for a process
- Replace a process-level token (you need to reboot the server for this policy to take effect)
The user credentials you enter for the Run As account are used to run all PowerShell scripts in tiles that use the Run As account. Once created, your Run As account can be used by other SquaredUp DS administrators to run their scripts. By using your or any user's credentials, you lose control over which scripts are executed in the name of this user which can cause privacy issues. In addition to that, users often have more rights than a script would need. By using a user account with extensive permissions, scripts that use the Run As can exploit those permissions.
- Click save to save the new Run As account.
The Run As account is now available in PowerShell tiles and can be used to execute scripts.
2) We strongly recommend you change the Default Run As account to the credentials you want to use as the default Run As.
Every PowerShell tile needs a Run As and if you haven't created a Run As yet, tiles will use the Default Run As. The Default Run As uses the SquaredUp DS app pool to run scripts. The SquaredUp DS app pool account might grant too many permissions that are not needed for your scripts and can potentially damage your system, which is why using this default account is not recommended. Create a service account that you want to use for the Default Run As and change the Default Run As to use those credentials.
- From the top right hand menu ☰ click system.
- Go to the PowerShell tab.
You see the Default Run As. If you haven't changed the Default Run As account yet, you see a yellow icon indicating that the Run As uses the not recommended default setting "run as SquaredUp DS app pool".
- Click on the Default Run As to edit it.
As long as the Run as SquaredUp DS app pool toggle is on, the Default Run As is read only.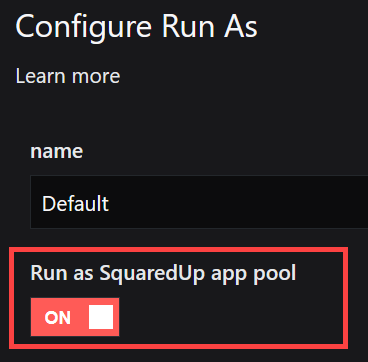
- Switch the Run as SquaredUp DS app pool toggle to off.
- Change the description to indicate that the Default Run As no longer uses the SquaredUp DS app pool.
- Enter the user credentials you want to use for the Default Run As.
Do not use your own or anyone's personal user account for Run As accounts. Instead, create a new account that is not used by a specific person (a "service account"), but only used for running PowerShell scripts. Consider the permissions of this service account carefully.
Required permissions for service accounts:
The service account you use for Run As must have at least the following permission:
- Allow log on locally
If you don't use the default NetworkService as your application pool identity, you might see the following error message when using Run As accounts: A required privilege is not held by the client.
In this case you need to add the application pool identity to the following policies:
- Adjust memory quotas for a process
- Replace a process-level token (you need to reboot the server for this policy to take effect)
The user credentials you enter for the Run As account are used to run all PowerShell scripts in tiles that use the Run As account. Once created, your Run As account can be used by other SquaredUp DS administrators to run their scripts. By using your or any user's credentials, you lose control over which scripts are executed in the name of this user which can cause privacy issues. In addition to that, users often have more rights than a script would need. By using a user account with extensive permissions, scripts that use the Run As can exploit those permissions.
- Click save to save the changes.
The Default Run As profile now uses the user account you entered when executing scripts.
3) Consider disabling the option to use the SquaredUp DS app pool for the Default Run As.
To make sure that the SquaredUp DS app pool can't be used after you changed the Default Run As, you can disable the option to use the SquaredUp DS App pool.
By default, the toggle Run as SquaredUp DS app pool is visible in the Default Run As account. By setting this toggle to on, the Default Run As can be (re)set to use the SquaredUp DS app pool to run scripts. SquaredUp DSadministrators can disable the toggle to prevent that the SquaredUp DSapp pool can be used for running PowerShell scripts.

- If you haven't already done it, change the Default Run As from using the SquaredUp DS app pool to using the credentials you want to use.
Note: If you disable the toggle Run as SquaredUp DS app pool while the Default Run As still uses the SquaredUp DS app pool (toggle on), the credentials in the Default Run As will be empty and any PowerShell tiles using the Default Run As will show an error. You need to go into the Default Run As and enter the credentials you want to use to fix this issue.- From the top right hand menu ☰ click system.
- Go to the PowerShell tab.
You see the Default Run As. If you haven't changed the Default Run As account yet, you see a yellow icon indicating that the Run As uses the not recommended default setting "run as SquaredUp DS app pool".
- Click on the Default Run As to edit it.
As long as the Run as SquaredUp DS app pool toggle is on, the Default Run As is read only.
- Switch the Run as SquaredUp DS app pool toggle to off.
- Change the description to indicate that the Default Run As no longer uses the SquaredUp DS app pool.
- Enter the user credentials you want to use for the Default Run As.
Do not use your own or anyone's personal user account for Run As accounts. Instead, create a new account that is not used by a specific person (a "service account"), but only used for running PowerShell scripts. Consider the permissions of this service account carefully.
Required permissions for service accounts:
The service account you use for Run As must have at least the following permission:
- Allow log on locally
If you don't use the default NetworkService as your application pool identity, you might see the following error message when using Run As accounts: A required privilege is not held by the client.
In this case you need to add the application pool identity to the following policies:
- Adjust memory quotas for a process
- Replace a process-level token (you need to reboot the server for this policy to take effect)
The user credentials you enter for the Run As account are used to run all PowerShell scripts in tiles that use the Run As account. Once created, your Run As account can be used by other SquaredUp DS administrators to run their scripts. By using your or any user's credentials, you lose control over which scripts are executed in the name of this user which can cause privacy issues. In addition to that, users often have more rights than a script would need. By using a user account with extensive permissions, scripts that use the Run As can exploit those permissions.
- Click save to save the changes.
The Default Run As profile now uses the user account you entered when executing scripts.
On the SquaredUp server, run Notepad as administrator (Start, Run, type
notepad, and then right-click and select Run as administrator).In Notepad, open the
security.jsonfile from the SquaredUp DS folder:...\User\Configuration\security.jsonIf the file doesn't exist, create it by following these steps and saving the file as
security.jsonat the end.Name of the SquaredUp folder
The default name of the SquaredUp folder is
SquaredUpfor v6 and above.For v5 it is
SquaredUpv5.Location of the SquaredUp folder
If you deployed SquaredUp DS via the Azure or AWS Marketplace:
The default location for the SquaredUp folder is
F:\.SquaredUpv[Version Number]
For v5 it isF:\SquaredUpv5.If you installed SquaredUp DS using the installer:
A custom location may have been chosen during the installation.
The default location for the SquaredUp folder is
C:\inetpub\wwwroot\SquaredUpFor v5 it is
C:\inetpub\wwwroot\SquaredUpv5.
Edit the JSON file to contain the following property:{ "enable-powershell-run-as-app-pool": false }
If the file already contains settings, then you will need to add a comma at the end of the previous line.- Save the JSON file.
- Recycle the SquaredUp DS application pool.
The toggle Run as SquaredUp DS app pool is now disabled and hidden. It is not possible to (re)set the Default Run As to use the SquaredUp DS app pool anymore.
4) Consider creating different service accounts for running different scripts, depending on what their purpose is and what permissions they need. Save each service account as a different Run As account in SquaredUp DS.
- Disable PowerShell V2.
PowerShell V2 has been deprecated and is now recognized as a security risk that can be used to run malicious scripts. Disable PowerShell V2 to prevent the risk of users being able to bypass various security measures.- Run the following PowerShell script on the server SquaredUp DS is installed on. The script checks if PowerShell V2 is enabled and disables it if it is enabled:
#Checks to see if Powershell V2 is enabled. If it is, it will be disabled

$State = Get-WindowsOptionalFeature -Online -FeatureName MicrosoftWindowsPowerShellV2
$State.State

IF ($State.State -eq "Enabled") {
    cls
    Write-Output "Powershell V2 is enabled"
    Write-Output "Disabling Powersell V2"
    Disable-WindowsOptionalFeature -Online -FeatureName MicrosoftWindowsPowerShellV2Root
    Write-Output "Powershell V2 has been disabled"
    }
ELSE {
    cls
    Write-Output "Powershell V2 is already disabled"
    }
- Run the following PowerShell script on the server SquaredUp DS is installed on. The script checks if PowerShell V2 is enabled and disables it if it is enabled:
- Enable PowerShell script block logging for improved monitoring.
- Run the following PowerShell script on the server SquaredUp DS is installed on if you want to enable script block logging:
CLS $RegPath = "HKLM:\SOFTWARE\Wow6432Node\Policies\Microsoft\Windows\PowerShell\ScriptBlockLogging" Set-Location HKLM: if (Test-Path "$RegPath") { "PATH" } else { New-Item -Path $RegPath -Force Set-ItemProperty -Path $RegPath -Name "EnableScriptBlockLogging" -Value 1 -Force } - If you want to disable script block logging again, run the following script:
#Disable Script Block logging

Set-ItemProperty -Path $RegPath -Name "EnableScriptBlockLogging" -Value 0 -Force
- Run the following PowerShell script on the server SquaredUp DS is installed on if you want to enable script block logging:
- Configure AppLocker or WDAC to control and restrict access to scripts, executables and libraries only trusted by Microsoft.
You can find more info in this external article: https://docs.microsoft.com/en-us/windows/security/threat-protection/windows-defender-application-control/wdac-and-applocker-overview - Disable the PowerShell tile feature if you don't need to use it.
By default, the PowerShell feature is available, but SquaredUp DS administrators can globally disable it. When the feature is disabled, any existing PowerShell tiles will still be visible to users as before but the scripts won't be executed anymore. Instead, PowerShell tiles will display the error message "PowerShell functionality is disabled". Administrators will still be able to create and edit PowerShell tiles, profiles and Run As accounts.
On the SquaredUp server, run Notepad as administrator (Start, Run, type
notepad, and then right-click and select Run as administrator).In Notepad, open the
security.jsonfile from the SquaredUp DS folder:...\User\Configuration\security.jsonIf the file doesn't exist, create it by following these steps and saving the file as
security.jsonat the end.Name of the SquaredUp folder
The default name of the SquaredUp folder is
SquaredUpfor v6 and above.For v5 it is
SquaredUpv5.Location of the SquaredUp folder
If you deployed SquaredUp DS via the Azure or AWS Marketplace:
The default location for the SquaredUp folder is
F:\.SquaredUpv[Version Number]
For v5 it isF:\SquaredUpv5.If you installed SquaredUp DS using the installer:
A custom location may have been chosen during the installation.
The default location for the SquaredUp folder is
C:\inetpub\wwwroot\SquaredUpFor v5 it is
C:\inetpub\wwwroot\SquaredUpv5.
Edit the JSON file to contain the following property:{ "enable-powershell-execution": false }
If the file already contains settings, then you will need to add a comma at the end of the previous line.- Save the JSON file.
- Recycle the SquaredUp DS application pool.
The PowerShell feature is now disabled. Scripts in existing PowerShell tiles won't be executed anymore.
- PowerShell Run As accounts
- Check the security settings in the
security.jsonfile.
There are multiple settings you can define in thesecurity.jsonfile that affect SquaredUp DS security. Check those settings and change them if needed.Properties you can set in the security.json fileOn the SquaredUp server, run Notepad as administrator (Start, Run, type
notepad, and then right-click and select Run as administrator).In Notepad, open the
security.jsonfile from the SquaredUp DS folder:...\User\Configuration\security.jsonIf the file doesn't exist, create it by following these steps and saving the file as
security.jsonat the end.Name of the SquaredUp folder
The default name of the SquaredUp folder is
SquaredUpfor v6 and above.For v5 it is
SquaredUpv5.Location of the SquaredUp folder
If you deployed SquaredUp DS via the Azure or AWS Marketplace:
The default location for the SquaredUp folder is
F:\.SquaredUpv[Version Number]
For v5 it isF:\SquaredUpv5.If you installed SquaredUp DS using the installer:
A custom location may have been chosen during the installation.
The default location for the SquaredUp folder is
C:\inetpub\wwwroot\SquaredUpFor v5 it is
C:\inetpub\wwwroot\SquaredUpv5.PropertyDescriptionenable-visio-svg-sanitizationSVG files uploaded to the Visio tile are sanitized by SquaredUp DS to prevent cross-site scripting (XSS) attacks, such as redirecting to a phishing site. If an SVG is failing to display correctly, then it is likely that certain tags are being removed by the sanitizer.
If you are unable to modify the original SVG then it is possible to disable SVG sanitization. This method is only available for SquaredUp DS v4.2 and above. Please be aware that disabling this feature presents a security risk and that it affects all SVGs uploaded to Visio tiles across the whole of SquaredUp DS.
Please ensure that if you choose to disable SVG sanitization, users are advised to remain vigilant and must be cautious of any strange behavior on pages containing uploaded SVGs.
Affected features: Visio tilePossible values:true,falseSecure option:trueenable-all- embedded-scriptsenable-embedded-scripts-whitelistFor security reasons scripts cannot be run in Web Content tiles (iframes) in SquaredUp DS v4.6 onwards.
If a site uses scripts, the web content tile might displaying nothing for that site, display the site in a poorly formatted manner, or there may be a message from the site itself indicating that it requires JavaScript to function correctly.
You can at your own risk override this security setting by whitelisting trusted sites.
To embed another SquaredUp DS dashboard using the Web Content tile you will need to whitelist your SquaredUp DS site.
Affected features: Web Content tilePossible values: websites in the formathttps://squaredupserver1.squaredup.com/Secure option: no whitelistingenable-powershell-executionEnables or disables the whole PowerShell feature (PowerShell tiles are turned off, no PowerShell script will be executed).Affected features: PowerShell tilePossible values:true,falseSecure option:false(if you are not using the PowerShell feature)enable-powershell-run-as-app-poolEnables or disables the ability to run PowerShell scripts as the SquaredUp DS app pool.Affected features: PowerShell Run As accountsPossible values:true,falseSecure option:falseenable-display-versionEnables or disables the display of the SquaredUp DS version number in the footer of the product. The default is for the version number to be shown. The edition text will still present e.g. SquaredUp DS for SCOM.Possible values:true,falseSecure option:falsedisable-view-draftsEnables or disables the ability for non-admin users to create dashboards. The default is for normal users on v5.9 onwards to be able to create dashboards, but not be able to publish them.Possible values:true,falseSecure option:trueYou can copy the code template below and use it for your security settings in the
security.jsonfile.Make sure to replace the values with the values that match your desired settings!
{
"enable-visio-svg-sanitization": true,
"enable-all-embedded-scripts": false,
"enable-embedded-scripts-whitelist": [
"https://squaredupserver1.squaredup.com/",
"https://squaredupserver1.squaredup.com/"
],
"enable-powershell-execution": true,
"enable-powershell-run-as-app-pool": false,
"enable-display-version": false,
"disable-view-drafts": true
}