Enabling High Availability
Understanding Primary and Secondary servers
Configure permissions on the share
Configuring each server for high availability
Upgrading SquaredUp DS when using high availability
- Only a few users can login an several features are unavailable
- SquaredUp DS is displaying a message that it is in read-only mode
- My providers, PowerShell profiles, and PowerShell Run As accounts are out of sync across HA servers
High availability (HA) allows you host two or more separate instances and having them read data from a shared location, such as a network share or drive.
High availability on SquaredUp DS works by mirroring the files on the share back onto the local disk.
This style of deployment is typically used to:
- Enable load balancing between servers hosting the same content
- Create two or more different access points into SquaredUp DS with different modes of authentication (e.g. one instance with Windows authentication and the other with forms)
Distributed file system (DFS) shares are supported, under the proviso that DFSR (replication) is either disabled, or works in a limited capacity on SquaredUp DS files. For example, performing replication only at specific times or manually when SquaredUp DS is not running. If DFSR is used then the Primary and Secondary servers will not see the same information.
Requirements
- Two or more separate servers for installing SquaredUp DS. For high availability to work, every SquaredUp server must be running exactly the same version.
- A shared network folder or drive
- A SquaredUp DS license with a Secondary activation key
SquaredUp DS Standalone Enterprise edition (or above) is required for access to the Splunk tile, ServiceNow tile, Azure App Insights tiles, High Availability, and Team Folders.
To upgrade please contact [email protected]
To check the license edition you are using see How to check which license key is being used.
Understanding Primary and Secondary servers
Decide which server will be your Primary SquaredUp server and which will be your Secondary server(s):
- A high availability setup must consist of at least one Primary server. Without a Primary server, the servers licensed as Secondary will operate with reduced functionality and named users.
- The Primary server will use the Primary license key, and any existing dashboards on this server will become the dashboards on the share, to be used by all servers.
- The Secondary server(s) will use the Secondary license key, the dashboards on these servers will be ignored and the content of the Primary server will take precedence. You can have one or more Secondary servers.
If a Secondary server is out of contact with the Primary server you will see a notification in the notifications area from the right-hand menu > notifications.
- Within 2-3 hours of the Primary server being unavailable for any reason you will receive a notification.
- After 3 days of no contact with the Primary server a critical notification is shown warning that shut down is imminent.
- After 5 days of no contact with the Primary server the Secondary server will no longer be available, effectively 'shut down'.
- After the 5 days you can recycle the Secondary server's SquaredUp application pool to restore limited access.
- Recycling the Secondary server's application pool, or rebooting it, at any point when the Primary is offline means that the Secondary server will drop down to limited access.
Limited access will allow only 3 named users and only the features in the free edition (Licensing Overview), so Team Folders, Splunk tiles, ServiceNow tiles and App Insights tiles will not be available.
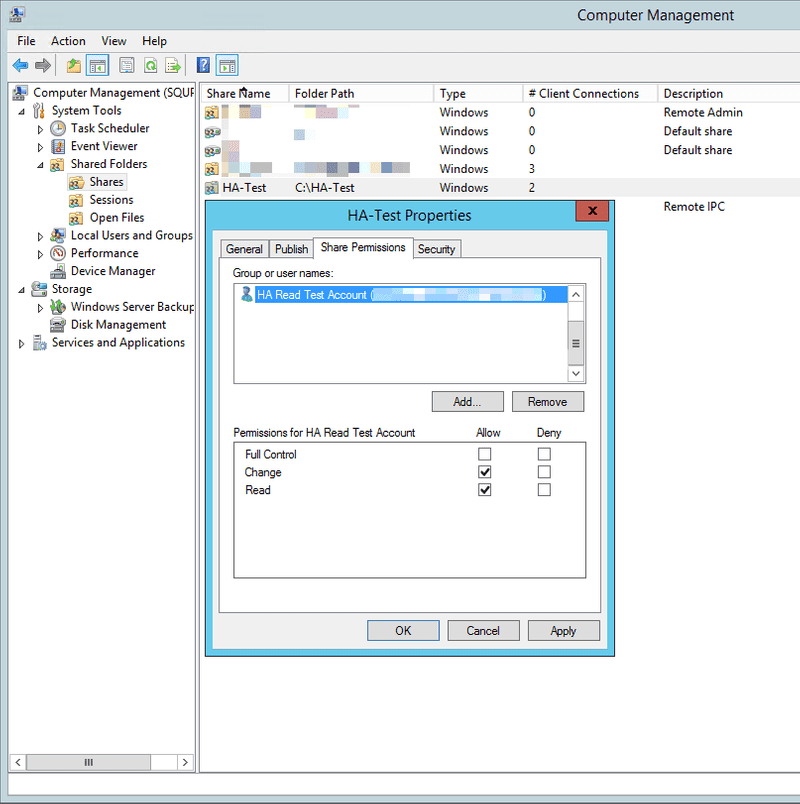
Configure permissions on the share
Before configuring HA it is important to check the permissions on the share itself. The share has its own permissions which cannot be viewed via Windows Explorer, and they always take precedence over the file and folder permissions. If the SquaredUp DS application pool identity (How to check and modify the application pool identity) is not allowed to read and change, then the permissions added to the folders by the SquaredUp command are overridden/ignored by the share, and SquaredUp DS will fail to start with an 'Access denied' error.
In Computer Management check that the SquaredUp DS application pool account has 'Read' and 'Change' permissions to the share itself, as described below:
- On the machine that hosts the share, click on the Start button > type
Computer Management> open Computer Management. - Navigate to System Tools > Shared Folders > Shares.
- Right-click on the SquaredUp share and then on Properties.
- On the Share Permissions tab, check that all SquaredUp DS application pool accounts have read and change permissions:
- If your servers are using a domain service account as the SquaredUp DS application pool identity (How to check and modify the application pool identity) then this account should be given read and change permissions.
If your SquaredUp servers are using Network Service as the SquaredUp DS application pool account (How to check and modify the application pool identity), then all the machine accounts for the SquaredUp Primary and Secondary servers should be given permissions, for example,Squpserver01$andSqupserver02$.
It should not be necessary to grant full control, and this could pose a security risk.
Configuring each server for high availability
The first server that you configure for HA, will be the one from which dashboards and profiles are copied to the HA share. Follow the steps below for each server, one at a time:
- Install and activate SquaredUp DS using the appropriate Primary or Secondary activation key (see or How to install SquaredUp DS Standalone using the installer).
- On the server open a command prompt as an administrator (from Start > type
cmd, right-click on the Command Prompt icon and click Run as administrator). - Change to the SquaredUp DS installation location, for example type:
cd C:\inetpub\wwwroot\SquaredUpName of the SquaredUp folder
The default name of the SquaredUp folder is
SquaredUpfor v6 and above.For v5 it is
SquaredUpv5.Location of the SquaredUp folder
If you deployed SquaredUp DS via the Azure or AWS Marketplace:
The default location for the SquaredUp folder is
F:\.SquaredUpv[Version Number]
For v5 it isF:\SquaredUpv5.If you installed SquaredUp DS using the installer:
A custom location may have been chosen during the installation.
The default location for the SquaredUp folder is
C:\inetpub\wwwroot\SquaredUpFor v5 it is
C:\inetpub\wwwroot\SquaredUpv5. - Identify whether the SquaredUp DS application pool identity is running as a domain service account or as NetworkService (How to check and modify the application pool identity) and run the SquaredUp command with
ha:
If the SquaredUp DS application pool identity is a domain service account use this account in the command:squaredup ha --path=<network share path> --user=domain\userwhereThe SquaredUp command for v6 and above is
SquaredUp. This is followed by an operator for the task you are carrying out, for exampleSquaredUp forms,SquaredUp windows, orSquaredUp ha.The SquaredUp command for v5 it is
SquaredUp5.domain\useris the SquaredUp DS application pool identity. First check what the SquaredUp DS application pool account is for each server is using (How to check and modify the application pool identity). In a load balanced environment using Windows authentication (Kerberos), both servers must be using the same application pool identity. (In environments not using Kerberos, it is possible for the servers to use different application pool identities). This allows the tool to give the specified SquaredUp DS application pool account read and write permissions to the folder and files on the share.
and where<network share path>should be replaced by a drive or path specification for your network share. The folder/share must already exist: SquaredUp DS cannot create it automatically (for example, specifying\\myhost\folderis invalid iffolderis not already shared bymyhost). The path should not contain a filename (i.e. it should be \myshare etc. and not \myshare\squaredup.index).
For example:
If your SquaredUp DS application pool identity is NetworkService you should use the SquaredUp server name followed by the $ dollar symbol as the username when you run the command on that server.squaredup ha --path=<network share path> --user=domain\SquaredUpServer$
whereSquaredUpServer$is the SquaredUp server name followed by $, for example,Squpserver01$.
Remember, that the first server that you run this command on will be the one from which dashboards and profiles are copied to the HA share. Later, after checking the Primary server is configured correctly you will run this command on all your other SquaredUp servers to configure each of them to use HA AND to give them permissions to the HA share.X:\\\myhost\folder(UNC path)
- Navigate to SquaredUp DS using a web browser either on the server itself, or from a client machine. (Note: The previous command will have automatically recycled SquaredUp DS, so you will need to login again).
- After logging in, the server should behave identically to how it did post-installation. There are several ways to confirm that HA is in effect:
For the Primary server:[WRN] Shared cryptography is enabled: behaving as a PRIMARY server
For a Secondary server:[WRN] Shared cryptography is enabled: behaving as a SECONDARY server- The path to which HA has been pointed (e.g.
\\myhost\folder) should contain a file calledSquaredUp_ds_[version].index
- The path to which HA has been pointed (e.g.
- The SquaredUp DS log (
\SquaredUp\transient\log\rolling.logSee Where to find log files) should contain the following text:
- Once the Primary is confirmed to be running in HA mode, the Secondary server(s) can be configured using the Secondary license key. Repeat the above steps for the Secondary servers. Content already present on these servers will be ignored and not displayed. Instead, each Secondary server will now behave as an exact mirror of the Primary server.
- After configuring HA, log in to the Secondary server(s) and check the configuration:
- The licensing details for the Secondary in the right-hand menu ☰ > system > named users should reflect the overall quantity of users that your license was purchased for
- The Secondary should now be displaying the same dashboards and content as the Primary.
- Newly created content on Primary or Secondary should be visible to both nodes.
Upgrading SquaredUp DS when using high availability
For high availability to work, every SquaredUp server must be running exactly the same version.
Upgrading SquaredUp DS in a high availability setup does not require all servers go offline for upgrade. Each server can be upgraded one at a time, and the other servers will continue to serve dashboards.
However, once upgrade of at least one server is performed, changes made to dashboards by servers running the old version of SquaredUp DS are ignored, and will be lost when those servers are eventually upgraded (that is to say, the dashboards and content in the upgraded servers becomes authoritative over dashboards and content from the older un-upgraded servers).
- 10 minutes after upgrade of a server is performed, the servers yet-to-be-upgraded will automatically enter a read-only state, to prevent new dashboards being created or edited. This is visible in SquaredUp DS as a yellow banner at the top of the page.
- Dashboards (or other content) created or edited on an un-upgraded server before the server automatically goes read-only, will be permanently lost once the server is upgraded to the newer version. For this reason, we recommend advising users to not make changes once you start your upgrade process.
Consider initiating your upgrades out-of-hours - even if you don't finish them on all servers. This way, all of the servers yet to be upgraded will have entered read-only mode automatically by the time users come to view or edit their content.
Follow the steps below to upgrade each server:
- Prepare to take the server you are upgrading offline. For example, notify users, disable the load balancer allocation for it, put it in maintenance mode etc.
- Download the latest version of SquaredUp DS, run the installer and upgrade the server.
- Log on to the SquaredUp DS on the server once upgraded.
- Upgrade any other SquaredUp servers.
Disabling high availability
You may wish to switch high availability off for one or more servers, for example if one of the servers is going to be unavailable for a long period of time. Remember, for SquaredUp DS to work with your full license allocation, you need to ensure that there is still a Primary licensed server available.
SquaredUp DS mirrors the content of the share location back to the local disk: So that each member of a high availability set is an approximate replica, even when disconnected from the share. This means that HA can safely be disabled at any time, and once disabled the content of SquaredUp DS will reflect the network share data at the point just before the link was broken.
- On the SquaredUp server open a command prompt as an administrator (from Start > type
cmd, right-click on the Command Prompt icon and click Run as administrator). - Change to the SquaredUp DS installation location, for example type:
cd C:\inetpub\wwwroot\squaredupName of the SquaredUp folder
The default name of the SquaredUp folder is
SquaredUpfor v6 and above.For v5 it is
SquaredUpv5.Location of the SquaredUp folder
If you deployed SquaredUp DS via the Azure or AWS Marketplace:
The default location for the SquaredUp folder is
F:\.SquaredUpv[Version Number]
For v5 it isF:\SquaredUpv5.If you installed SquaredUp DS using the installer:
A custom location may have been chosen during the installation.
The default location for the SquaredUp folder is
C:\inetpub\wwwroot\SquaredUpFor v5 it is
C:\inetpub\wwwroot\SquaredUpv5. - Run the SquaredUp command with
hato disable HA:squaredup ha --disableThe SquaredUp command for v6 and above is
SquaredUp. This is followed by an operator for the task you are carrying out, for exampleSquaredUp forms,SquaredUp windows, orSquaredUp ha.The SquaredUp command for v5 it is
SquaredUp5.
You will also need to reconfigure the load balancer allocation to take into account the server(s) no longer available.
Moving the HA share
To move the HA share, the initial setup steps can simply be repeated as below, just specifying a new share path. This is because each server maintains a local disk copy of the share content - and the first server to startup after being pointed at the new share will build the share’s content from its own.
- Create the new share and follow the steps to Configure permissions on the share.
- On any SquaredUp server run the steps to Configuring each server for high availability using the path of the new share.
- Browse to SquaredUp DS in a web browser and log in. This will restart SquaredUp DS as the previous command will have automatically recycled the SquaredUp DS application pool. The files will be copied to the share from the first SquaredUp DS instance to start up. It should not matter which SquaredUp DS instance this is, as they should all be in sync, having been using HA previously. If you need to specify form which SquaredUp DS instance the files are copied to the new share, you should take care to open this SquaredUp DS instance by browsing to it directly, for example
https://SquaredUpServer1/SquaredUpIf you used the downloadable installer:
By default, the URL to your SquaredUp DS instance is:
http://SquaredUpServer/SquaredUpInstanceSquaredUpServeris the name of the server where SquaredUp DS is installed.By default,
SquaredUpInstanceisSquaredUp. For v5 it isSquaredUpv5. If you gave your SquaredUp DS instance a different application name when you installed it, use the name you chose.On the server it would be
http://localhost/SquaredUpIf you deployed SquaredUp DS from the Azure Marketplace:
The URL is
https://DNSNameof the virtual machine (VM) deployed. - Run the steps to Configuring each server for high availability on all the other servers using the path of the new share. This will point all the servers to the new share and the files that were copied there in the previous step.
Backup SquaredUp DS on each server as normal (How to backup and restore SquaredUp DS Standalone). No additional actions are required: Any SquaredUp server can rebuild the content of the network share from its local disk data. So backing up individual SquaredUp DS instances (and not the network share) is sufficient.
If the share does have to be recreated, ensure you configure permissions on the share first:
Before configuring HA it is important to check the permissions on the share itself. The share has its own permissions which cannot be viewed via Windows Explorer, and they always take precedence over the file and folder permissions. If the SquaredUp DS application pool identity (How to check and modify the application pool identity) is not allowed to read and change, then the permissions added to the folders by the SquaredUp command are overridden/ignored by the share, and SquaredUp DS will fail to start with an 'Access denied' error.
In Computer Management check that the SquaredUp DS application pool account has 'Read' and 'Change' permissions to the share itself, as described below:
- On the machine that hosts the share, click on the Start button > type
Computer Management> open Computer Management. - Navigate to System Tools > Shared Folders > Shares.
- Right-click on the SquaredUp share and then on Properties.
- On the Share Permissions tab, check that all SquaredUp DS application pool accounts have read and change permissions:
- If your servers are using a domain service account as the SquaredUp DS application pool identity (How to check and modify the application pool identity) then this account should be given read and change permissions.
If your SquaredUp servers are using Network Service as the SquaredUp DS application pool account (How to check and modify the application pool identity), then all the machine accounts for the SquaredUp Primary and Secondary servers should be given permissions, for example,Squpserver01$andSqupserver02$.
It should not be necessary to grant full control, and this could pose a security risk.
To restore the files to a new or empty HA share run the HA configuration steps from any SquaredUp server, to copy the files from this server to the share. See Enabling High Availability
To restore to an existing share folder you must delete the file SquaredUp_ds_[version].index, if it exists, in order for the restore to proceed. Restoring will then recreate the SquaredUp_ds_[version].index file on the share.
Troubleshooting
Only a few users can login an several features are unavailable
Only 3 users can login and several features such as Team Folders, Splunk tiles, ServiceNow tiles and App Insights tiles are unavailable
Check that HA mode is enabled, and that the Primary server is available.
Recycling the Secondary server's application pool, or rebooting it, at any point when the Primary is offline means that the Secondary server will drop down to limited access.
Limited access will allow only 3 named users and only the features in the free edition (Licensing Overview), so Team Folders, Splunk tiles, ServiceNow tiles and App Insights tiles will not be available.
For more details see Understanding Primary and Secondary servers.
SquaredUp DS is displaying a message that it is in read-only mode
A SquaredUp DS instance will go into read-only mode if it notices that it is running an older version to another server.
Read-only mode will end once the server is upgraded to the same version.
My providers, PowerShell profiles, and PowerShell Run As accounts are out of sync across HA servers
In a High Availability environment, it can happen that the following items are not properly synced across servers:
Providers contain the connection details to external platforms. A provider only needs to be set up once and can then be used when creating tiles on a dashboard.
There are two types of integrations and therefore providers:
- generic Web API providers that can connect to any REST API
- dedicated providers that connect to a specific external platform or database (SQL, ServiceNow, Azure Active App Insights, Elasticsearch, etc.)
PowerShell profiles contain re-usable scripts with encrypted sensitive data.
A PowerShell profile is created once and then can be re-used in PowerShell tiles. Only administrators can create PowerShell profiles. Since PowerShell profile scripts are encrypted and can only be seen by administrators, you can safely store scripts that contain credentials, authentication tokens, etc. You can also load external modules in a profile (e.g. a VMWare module downloaded from the internet).
You can also use PowerShell profiles for more sophisticated code, for example if your tile needs to combine data from two different API connections, you can put credentials for both connections in the profile. Make sure to give your profile a meaningful description to remember which provider(s) the profile connects to and what it does with the data.
SquaredUp DS users who can edit tiles due to their Team Folder permissions can use PowerShell profiles in their PowerShell tiles, but they can’t see the underlying script.
PowerShell Run As accounts contain the credentials that define the permissions deciding how PowerShell scripts are run (both the script in the tile and the profile script chosen for the tile).
The PowerShell Run As account Default comes with every SquaredUp DS installation and uses the SquaredUp DS app pool identity to run the scripts. Since running PowerShell scripts within the SquaredUp DS application pool process can pose a security risk and affect SquaredUp DS performance, you can change the default Run As to use a different account.
You can also add new Run As accounts to be able to execute scripts with different credentials.
Solution:
On your primary server, make an edit to any of your providers, PowerShell profiles, or Run As accounts.
Editing one provider will trigger a sync between all your providers across all your servers. Editing one PowerShell profile will sync all your PowerShell profiles, and editing one Run As account will sync all your Run As accounts.