How to install SquaredUp DS Standalone using the installer
Installing SquaredUp DS Standalone takes just 5 minutes. It can be installed on any server and does not require any new databases.
This articles covers how to install SquaredUp DS Standalone for the first time using the installer.
If you have an earlier version of DS Standalone already installed, then the installer will upgrade your installation, see How to upgrade SquaredUp DS Standalone
SquaredUp DS Standalone can be installed on any Windows Server or Windows 10 VM or on-prem machine. The setup application will automatically install IIS and any other prerequisites.
As Internet Explorer is not supported, check that another browser is set as the server's default browser (search Windows > default apps).
Here is what we recommend:
Ideally provision a new server dedicated to hosting SquaredUp DS
Alternatively, install it on an existing Web Console Server
Run the installer .exe on the machine that you want to be your SquaredUp DS server.
Click Next
Accept the License Agreement and click Install. Prerequisites will be installed if not installed already. A restart of the server may be required. If your server has restarted the install should resume when the server restarts, but you may need to click Deploy SquaredUp DS from the Start menu.
Click Next to move on to check the deployment location. If the installer detects a version of DS Standalone is already installed then it will default to an In-Place upgrade, meaning that it will upgrade the current DS Standalone instance. See How to upgrade SquaredUp DS Standalone.
Check the installation details and click next.
SquaredUp DS can be installed in two different layouts:
As an application as a subfolder of the Default Web Site. This is the default installer layout.
At the website root, this layout is used to deploy SquaredUp DS to a dedicated web site.
Application
The default installer layout is Application and the physical path is configured as a subfolder of the Default Web Site. The SquaredUp DS installer will create the application and app pool automatically based on the information that is provided, assuming that the Default Web Site exists.
While the physical path in this configuration does not necessarily need to be a subfolder of the web site’s physical path, it must not be set to the same path as the web site. For instance, if the Default Web Site’s physical path is C:\inetpub\wwwroot as shown in the screenshot below, then the Physical disk path set in the SquaredUp DS installer would typically be C:\inetpub\wwwroot\SquaredUp. It must not be C:\inetpub\wwwroot as this would cause SquaredUp DS to exhibit unexpected behavior.
This layout should also be selected if SquaredUp DS is to be installed as an Application underneath a website other than the Default Web Site. As is the case with installing to the Default Web Site, the target web site must already exist in IIS. Update the Website field on the Paths tab of the installer to match the target web site name and set the Physical disk path field to an appropriate path, ensuring that this path is different to the target web site’s physical path.
Website root
The Website root layout is used to deploy SquaredUp DS to a dedicated web site. In this instance, the Physical disk path will match the web site’s physical path. The SquaredUp DS installer will create the web site and application pool automatically using the information provided, so there is no need to manually create the web site prior to installing SquaredUp DS.
Setting the Pool Identity
With the layout selected, the log on account for the SquaredUp DS app pool can be configured. By default this is set to Network Service, but it can be changed to a domain account if needed:
Optionally, the SCOM server address can be entered into the installer at this point, but this information is also requested later on in the installation wizard.
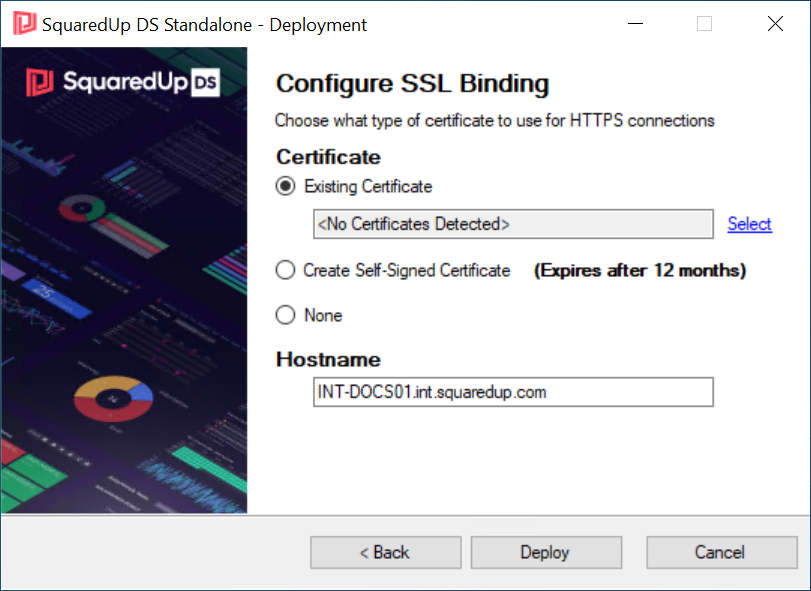
If SSL is not already configured for the chosen website, then the Configure SSL Binding page will appear. You will need to choose whether you want to configure an SSL certificate.
Existing Certificate
Use this option to choose an existing SSL certificate.
Create Self-Signed Certificate
The installer will create a new self-signed certificate, set to expire after 12 months.
None
This will not configure any SSL bindings. You can configure an appropriate binding manually within IIS later if you wish.
Clicking Finish at the end of the installation will open SquaredUp DS Standalone in a browser.
If it doesn't open automatically browse to the URL for SquaredUp DS:
If you used the downloadable installer:
By default, the URL to your SquaredUp DS instance is: http://SquaredUpServer/SquaredUpInstance
SquaredUpServer is the name of the server where SquaredUp DS is installed.
By default, SquaredUpInstance is SquaredUp. For v5 it is SquaredUpv5. If you gave your SquaredUp DS instance a different application name when you installed it, use the name you chose.
On the server it would be http://localhost/SquaredUp
If you deployed SquaredUp DS from the Azure Marketplace:
The URL is https://DNSName of the virtual machine (VM) deployed.
If the browser appears blank when browsing to SquaredUp DS, ensure the server's default browser is not set to Internet Explorer, which is no longer supported. To check your default browser, search Windows > default apps.
SquaredUp DS works best with the latest versions of Edge, Chrome, Firefox and Safari on desktop & mobile.
Internet Explorer is not supported on SquaredUp DS v5 and above. Older browsers may show a blank page.
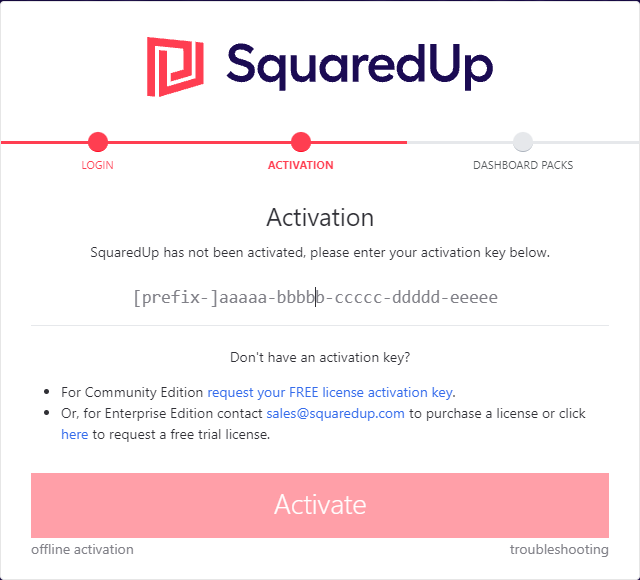
Before you can get started, SquaredUp DS Standalone has to complete some final configuration of your environment, such as activating your license.
Give dashboard authors permission to create dashboards. A SquaredUp DS administrator will need to give users or groups author permission to a Team Folder, within which they can create and edit dashboards. See Team Folders